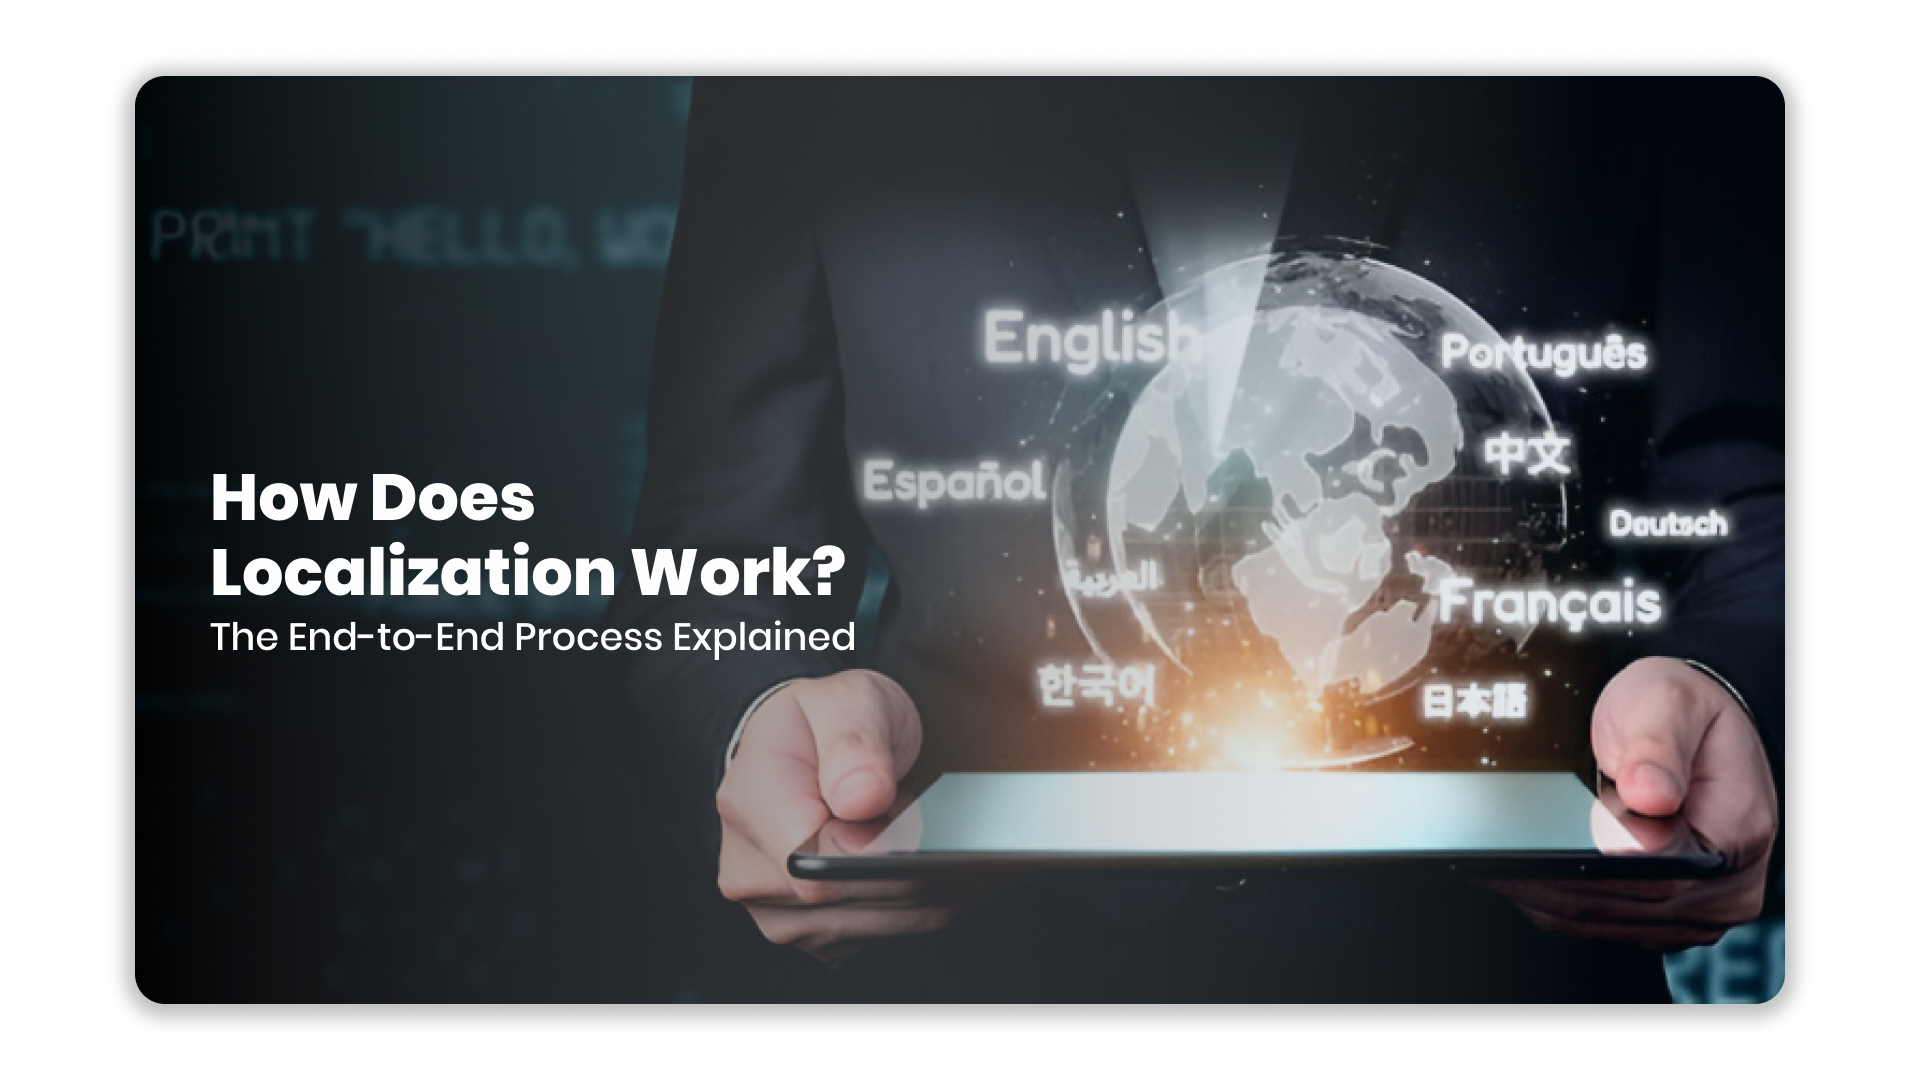
Expanding your business into a new region requires more than a translated website. You need a system that adapts your entire digital presence to a new culture. This process is called localization, and its success depends on a clear, repeatable workflow. A haphazard approach leads to inconsistent branding and technical errors.
Localization is a strategic operational process, not a one-time translation task. It involves multiple coordinated stages, from initial planning to ongoing updates. Understanding this workflow helps you allocate resources and set realistic timelines for your teams. It transforms a complex project into a manageable business operation.
This guide explains the standard localization workflow stage by stage. You will see how content moves from preparation to live publication. We break down the mechanics behind successful global digital expansion.
Quick Look:
- Localization is a six-stage workflow: Discovery, Preparation, Translation, Engineering, Launch, and Maintenance.
- The Discovery stage defines strategy, scope, and rules, preventing rework later.
- Translation uses a TEP (Translate, Edit, Proofread) model within a management platform for quality.
- Localized content must be rebuilt and tested within the product’s codebase.
- Going live involves controlled releases, redirects, and post-launch monitoring.
- Maintenance handles updates via continuous localization models, not one-off projects.
How Does Localization Work: A 6-Stage Process
Understanding how localization works in practice helps enterprises avoid rework, reduce costs, and scale multilingual content with confidence. The localization workflow is a sequential operational model. Each stage has distinct goals, actions, and deliverables that feed the next. This engine is powered by a combination of human expertise and technology.
The six core stages are Discovery, Preparation, Translation, Engineering, Launch, and Maintenance. These stages often run in parallel for different content batches in large projects. For instance, while one batch is in translation, another can be in quality assurance.
A centralised management platform orchestrates this flow and maintains visibility. This structure provides the framework for all subsequent detailed actions. We will now walk through each stage, detailing what happens and who is involved.
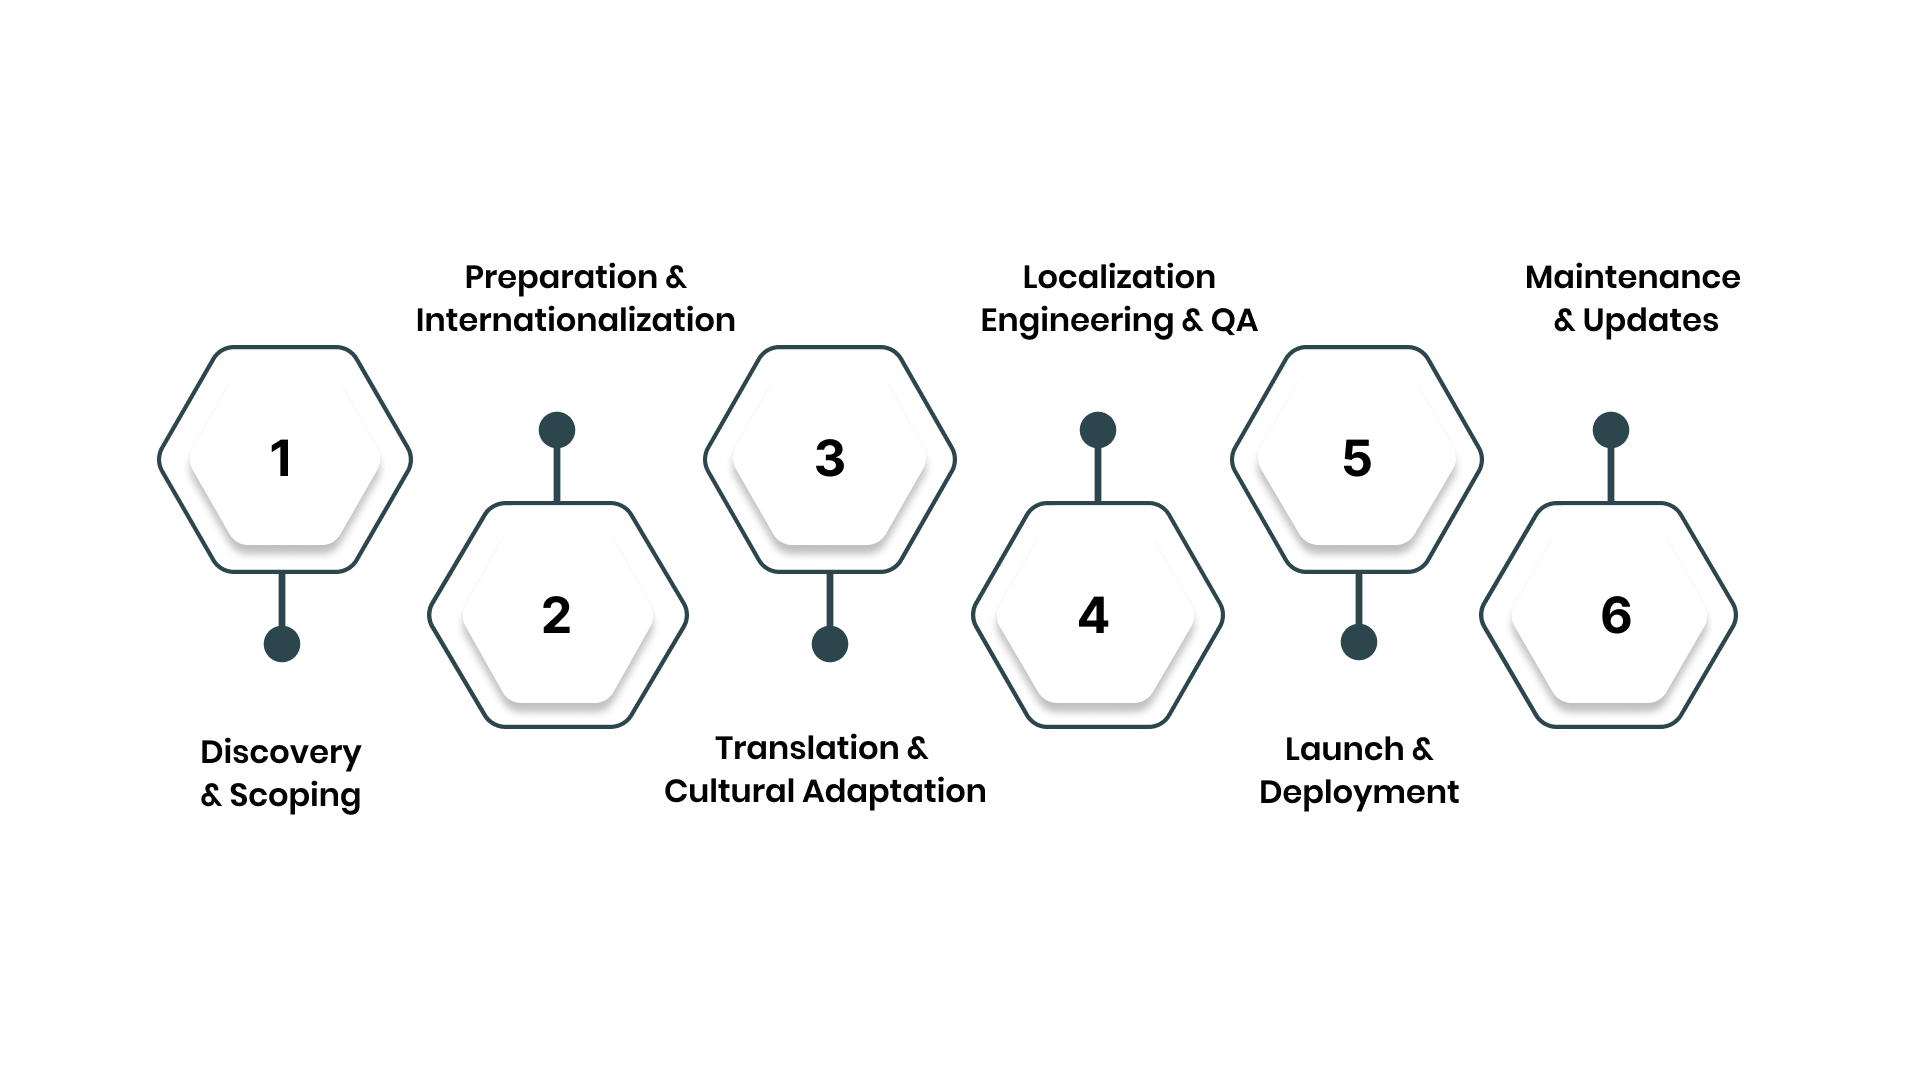
Stage 1: Discovery & Scoping (The Blueprint)
The discovery stage sets the strategic and operational foundation for the entire project. Rushing through this phase guarantees costly revisions and delays later. Here, you define the what, why, and how before any adaptation begins.
This blueprint aligns all stakeholders and sets clear expectations. The core actions in this stage create your project’s rulebook:
1. Define Strategy, Scope, and Target Markets
You must identify which locales to target and what content to localise first. Analyse market data, customer demand, and competitive presence to prioritise.
Define clear business goals, like increasing market share or reducing support calls. This strategic filter guides all downstream decisions.
Key actions in this stage:
- Conduct a content audit: Catalogue all source material (website copy, UI, help docs) to be localised.
- Perform market analysis: Use data to select and prioritise target regions and languages.
- Set measurable KPIs: Define success metrics like conversion rate, lift or customer satisfaction scores.
2. Create Centralised Linguistic Assets
Your translators and reviewers need a single source of truth for brand voice. This involves building a style guide and a comprehensive terminology glossary.
The style guide defines tone, formality, and formatting rules. The glossary ensures consistent translation of key product names and terms.
Key actions in this stage:
- Develop a style guide: Document rules for brand voice, tone, and grammatical preferences.
- Build a master glossary: Define and approve translations for key brand and product terms.
- Establish brand voice: Ensure marketing and technical content have distinct, consistent guidelines.
3. Plan Resources, Budget, and Timeline
Localisation requires realistic allocation of people, time, and money. Determine whether you will use in-house linguists, agencies, or a hybrid model.
Build a project timeline that accounts for all six stages, not just translation. Secure stakeholder sign-off on the scope, budget, and delivery milestones.
Key actions in this stage:
- Assemble the team: Assign project managers, internal reviewers, and select translation vendors.
- Build the project plan: Create a timeline with milestones for each stage of the workflow.
- Finalise the budget: Model costs based on word count, language pairs, and technical complexity.
Also Read: How Can Localisation of Your eCommerce Website Reduce Bounce Rates?
Looking to define your localization blueprint? Anuvadak helps you scope projects, build glossaries, and set clear KPIs from day one. Contact us to map out your strategy.
Stage 2: Preparation & Internationalization (Setting the Stage)
Preparation involves extracting and organising your source content for efficient translation. This stage also includes internationalisation, a technical prerequisite for localisation.
Internationalisation means designing and building your product to support multiple languages. Skipping this step causes major engineering rework later.
This stage makes your content translation-ready and technically sound:
1. Extract and Package Source Content
You must isolate all translatable text from your codebase and content management system (CMS). This includes user interface strings, website copy, and documentation.
Content is typically exported into standard interchange formats like XLIFF or JSON. These files are then uploaded to a Translation Management System (TMS).
Key actions in this stage:
- Use connectors or APIs: Automatically extract content from your CMS, code repositories, or design files.
- Package translatable strings: Export text into standardised files, separating it from code.
- Prepare reference materials: Provide translators with screenshots, design mockups, and context notes.
2. Verify Technical Readiness (Internationalisation)
Your product’s architecture must support different languages, date formats, and currencies. Engineers check the code for hard-coded text, ensuring all strings are externalised.
They verify the UI can handle text expansion (common in Indian languages) and right-to-left scripts. This prevents functional bugs during the engineering stage.
Key actions in this stage:
- Externalise all strings: Ensure no text is embedded directly in the application code.
- Design for text expansion: Build UI containers that can accommodate longer translated text.
- Enable locale-specific formats: Set up systems to dynamically display correct dates, numbers, and currencies.
3. Configure the Translation Management Workflow
Within your TMS, you set up the project-specific workflow. This involves assigning linguists, configuring the review cycle, and applying the glossary and style guide.
You define who receives tasks and the approval path for finalised translations. This digital workflow automates the handoffs between team members.
Key actions in this stage:
- Onboard linguists and reviewers: Add team members to the TMS project with defined roles.
- Apply linguistic assets: Load the project’s style guide and glossary into the platform.
- Configure task automation: Set rules for automatically assigning jobs based on content type or language.
Stage 3: Translation & Cultural Adaptation (The Core Conversion)
This stage transforms your source content into culturally relevant material for the target locale. It uses a structured linguistic workflow to ensure quality and consistency.
Professional localisation employs a multi-step process, not a single translation pass. The goal is to produce text that resonates as if originally created in the target language.
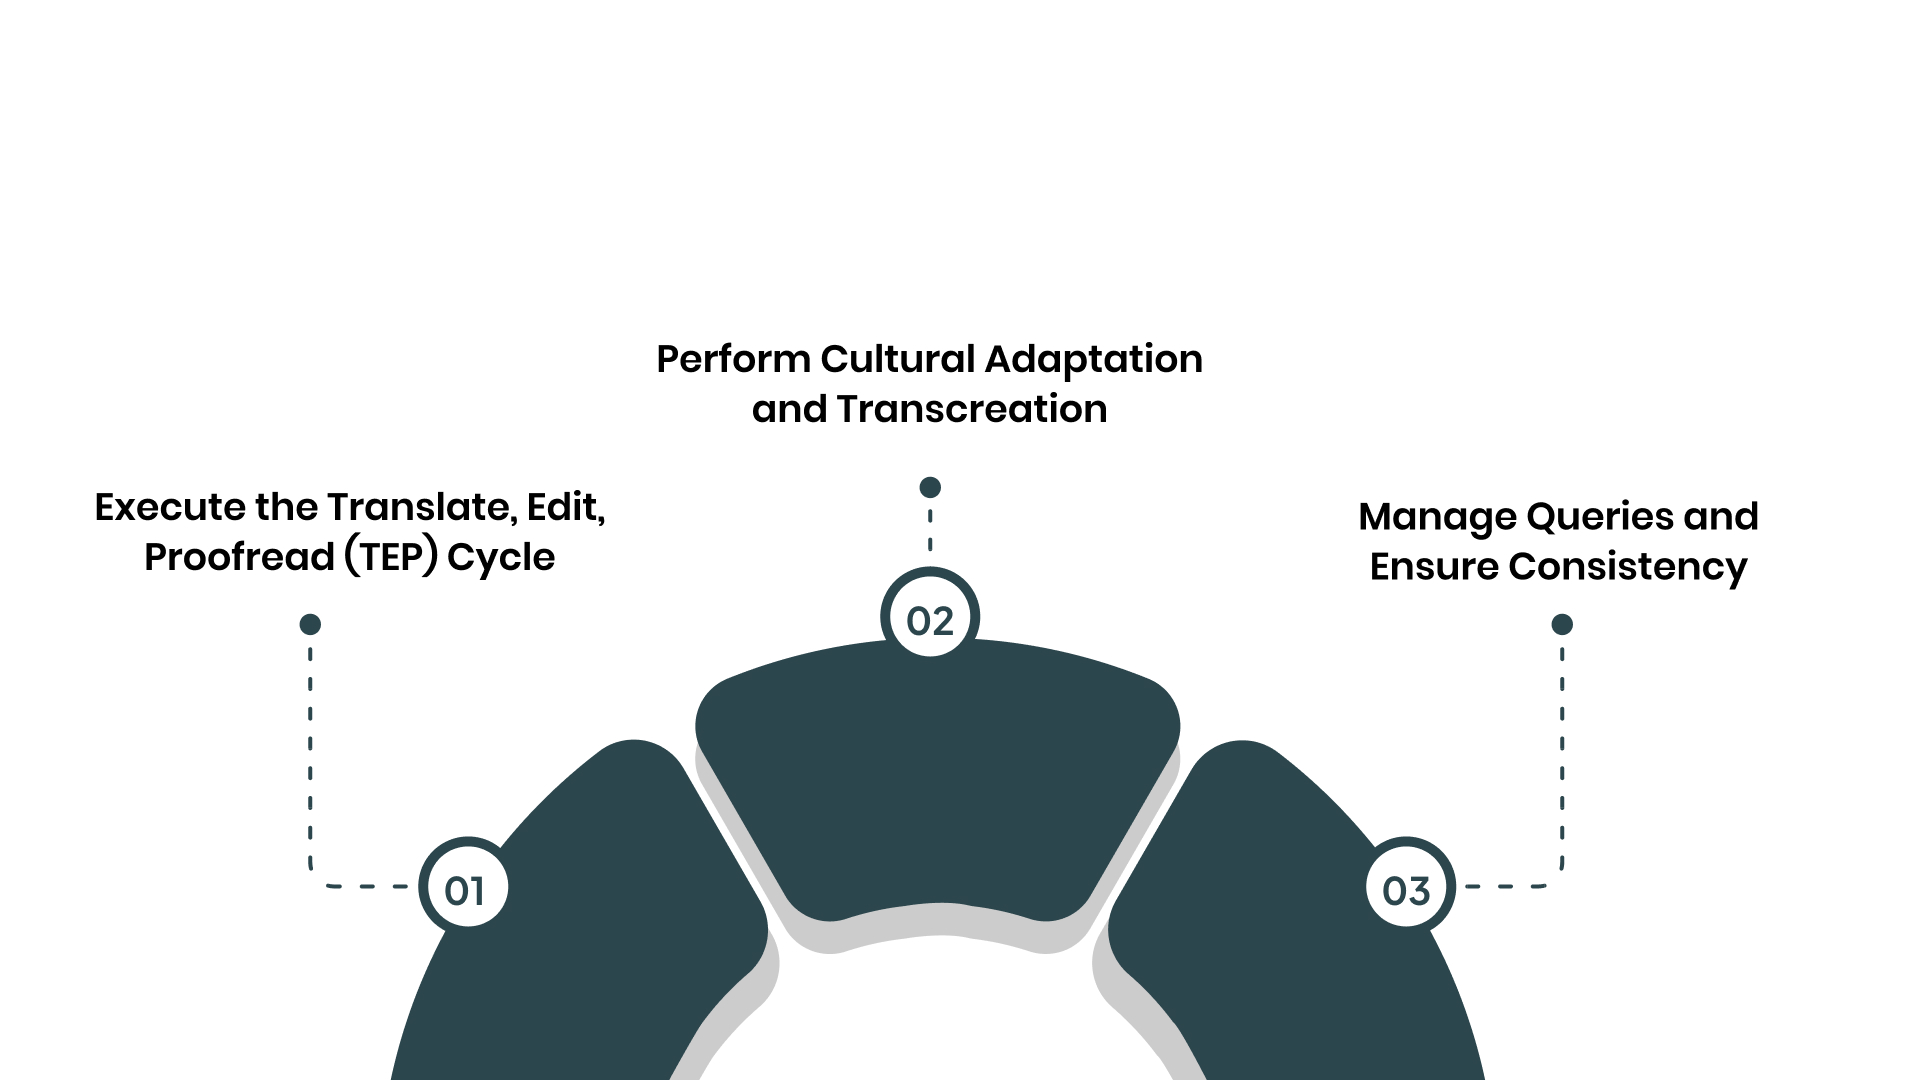
The work here follows a rigorous quality cycle:
1. Execute the Translate, Edit, Proofread (TEP) Cycle
The TEP model is the industry standard for quality assurance. A translator converts the source text, focusing on meaning and terminology.
An editor then reviews for accuracy, fluency, and adherence to the style guide. A proofreader performs a final pass for typographical errors and consistency.
Key actions in this stage:
- Translation: A specialist produces the first draft, using the glossary and translation memory.
- Editing: A second linguist reviews for context, terminology, and cultural appropriateness.
- Proofreading: A final reviewer checks for minor errors, formatting, and overall cohesion.
2. Perform Cultural Adaptation and Transcreation
Certain content requires creative adaptation, not direct translation. Marketing slogans, humour, and idioms often need complete rewriting, or transcreation.
The linguist adapts the core message to evoke the same emotion and response in the new culture. Visual references in the text may also need alteration.
Key actions in this stage:
- Identify transcreation needs: Flag marketing copy, taglines, and cultural references for creative adaptation.
- Adapt imagery and examples: Change references to localise examples, measurements, and social norms.
- Secure client review: Have your market-specific marketing team approve the adapted creative content.
3. Manage Queries and Ensure Consistency
Translators raise queries if the source text is ambiguous or contradictory. Project managers route these questions to the appropriate internal expert for clarification.
The TMS uses Translation Memory (TM) to automatically suggest previously translated identical sentences. This ensures consistency and reduces costs across the project.
Key actions in this stage:
- Resolve linguistic queries: Facilitate communication between translators and subject matter experts.
- Leverage translation memory: The TMS reuses approved translations for repeated phrases.
- Update linguistic assets: Refine the glossary and style guide based on decisions made during translation.
Also Read: How can Banks Enhance Trust in Customers with Banking Localisation?
Stage 4: Localization Engineering & QA (Technical Integration)
Localization engineering reintegrates the translated content back into your product or website. This stage ensures the localized version functions perfectly from a technical perspective.
It involves building, testing, and fixing any issues that arise. A dedicated engineer often handles this to prevent burdening your core development team.
This stage bridges linguistic work with a live product:
1. Reintegrate Localized Files and Build
The approved translation files are imported back into the codebase or CMS. The localization engineer runs a build process to generate the localized version of the product.
They ensure all text displays correctly and that no characters are corrupted or missing. This creates a functional, standalone version of your app or site.
Key actions in this stage:
- Import translated assets: Replace source strings in the code with the localized files from the TMS.
- Execute a locale-specific build: Generate a testable version of the product for the target language.
- Verify basic rendering: Confirm all text appears and the application launches without errors.
2. Conduct Functional and Linguistic QA
Quality Assurance testers methodically check the localized build. They verify that every user interface element works: buttons click, forms submit, and filters function.
Linguistic QA involves reviewing the translated text in context, checking for truncation or layout issues. They also test locale-specific features like date pickers and currency converters.
Key actions in this stage:
- Test all user flows: Validate sign-up, checkout, and navigation in the localized interface.
- Check in-context linguistics: Ensure translations fit their buttons, menus, and pop-ups correctly.
- Validate regional settings: Test that dates, times, numbers, and addresses format according to the locale.
3. Implement International SEO and Final Checks
For websites, technical SEO elements must be localised. This includes implementing correct hreflang tags to tell search engines about language versions.
Meta titles and descriptions should be translated and optimised for local search terms. A final pre-launch check confirms all redirects and sitemaps are correctly configured.
Key actions in this stage:
- Add hreflang tags: Insert correct HTML tags linking language versions for search engines.
- Optimise metadata: Translate and localise page titles, meta descriptions, and alt text.
- Final verification: Confirm site speed, mobile responsiveness, and cross-browser compatibility.
Worried about technical bugs in your localized build? Anuvadak’s APIs enable clean content handoff, reducing engineering rework and ensuring functional integrity. Contact us to learn more about seamless tech stack integration.
Stage 5: Launch & Deployment (Going Live)
Deployment is the controlled process of making the localized product available to end-users. A direct, unmanaged switch can be risky if undiscovered bugs exist.
This stage involves planned release strategies, monitoring, and communication. The goal is a smooth transition that provides a flawless first impression.
A strategic launch minimises risk and maximises impact:
1. Execute a Controlled Release Strategy
For digital products, consider a phased rollout like a canary release or feature flag. You might initially release the localized site to a small percentage of traffic from the target region.
This allows you to monitor performance and catch critical issues with limited exposure. Gradual scaling ensures stability.
Key actions in this stage:
- Use phased deployment: Release to a small user segment first, then gradually increase to 100%.
- Set up geo-redirects: Automatically direct users from specific regions to their language version.
- Communicate internally: Alert support, sales, and marketing teams about the go-live.
2. Monitor Performance and User Feedback
Immediately after launch, closely monitor technical performance and user behaviour. Watch for error rate spikes, slow page loads, or broken flows in analytics.
Set up channels to collect direct user feedback from the new market. Early detection allows for rapid hotfixes if necessary.
Key actions in this stage:
- Monitor analytics dashboards: Track error rates, conversion funnels, and engagement metrics.
- Activate feedback channels: Use in-app feedback tools or dedicated support channels for the new locale.
- Prepare a rapid response plan: Have engineers and linguists on standby for critical post-launch fixes.
3. Officially Launch and Promote
Once stability is confirmed, announce the full launch to your target market. Marketing teams execute campaigns tailored to the region via appropriate channels.
Update all relevant listings, such as app store descriptions for mobile apps. The launch marks the transition from project to active market presence.
Key actions in this stage:
- Launch marketing campaigns: Promote the localized product through regional social media, PR, or email.
- Update public-facing materials: Localise app store pages, press releases, and partner communications.
- Declare launch complete: Officially close the initial project phase and transition to maintenance mode.
Also Read: Website Localisation – A High Impact Technique to Enhance Website Traffic
Stage 6: Maintenance & Updates (The Continuous Cycle)
Your source product will evolve with new features, blog posts, and bug fixes. The localized versions must be updated to remain relevant and functional.
Maintenance treats localization as a continuous process, not a one-off project. This stage uses automation to synchronize updates efficiently across all languages. It also ensures your investment remains current and valuable:
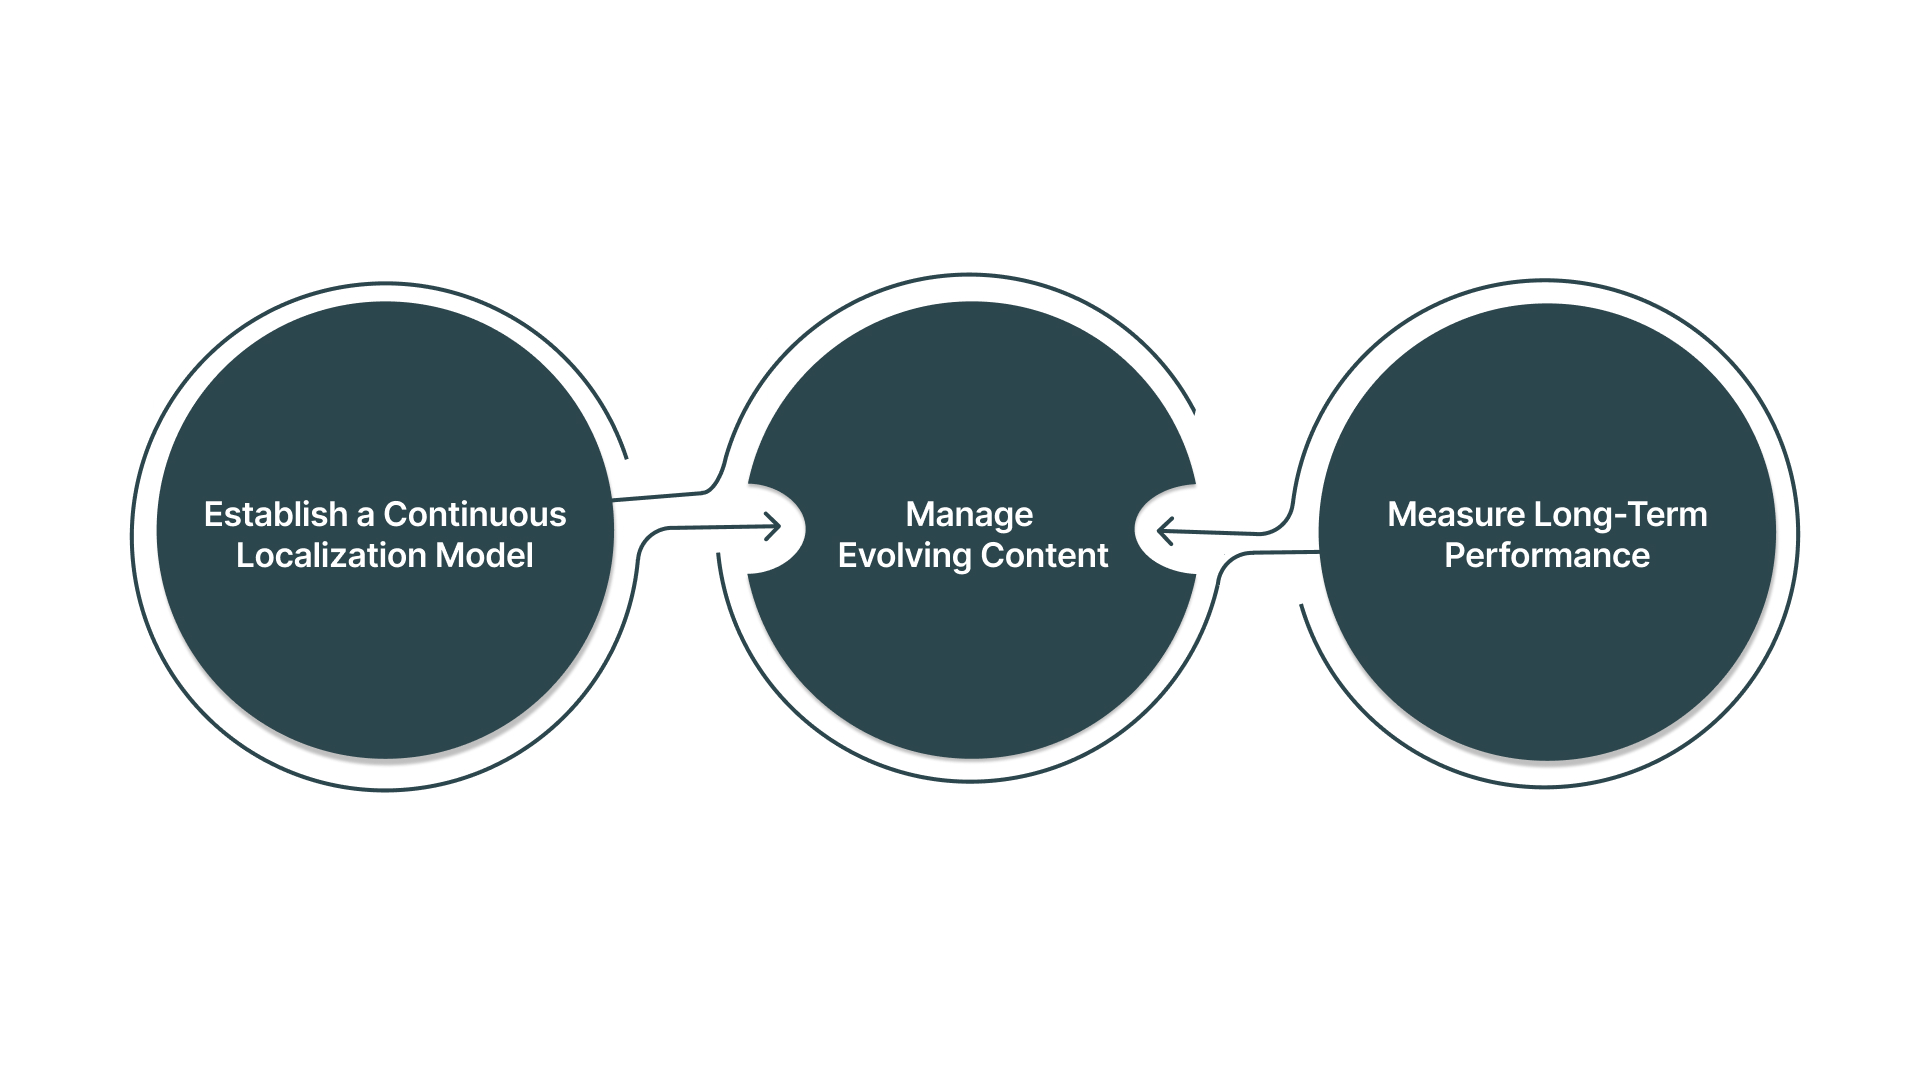
1. Establish a Continuous Localization Model
Connect your source code repository or CMS directly to your TMS. Any new or updated source strings are automatically detected and sent for translation.
Approved translations are automatically fed back into the development pipeline. This creates a seamless loop for ongoing updates.
Key actions in this stage:
- Automate content detection: Integrate your TMS with development and content systems to catch updates.
- Streamline the update workflow: Use the same TEP cycle but for smaller, frequent batches of changes.
- Schedule regular releases: Bundle localized updates into your product’s regular release cadence.
2. Manage Evolving Content and Terminology
As your product changes, your glossary and style guide must evolve. New features introduce new terms that require definition and translation.
Regular reviews ensure your linguistic assets stay current and effective. This prevents terminology drift and inconsistency over time.
Key actions in this stage:
- Review and update glossary: Add new product terms and retire old ones on a quarterly basis.
- Audit translation memory: Clean the TM periodically to remove outdated or poor-quality translations.
- Gather linguistic feedback: Use a translator and user feedback to improve style guides.
3. Measure Long-Term Performance and ROI
Report on the business impact of your localized products using the KPIs set in Stage 1. Analyse market-specific conversion rates, revenue, customer satisfaction, and support ticket volume.
This data justifies the ongoing investment in maintenance and guides future expansion decisions.
Key actions in this stage:
- Report on KPIs: Regularly share performance metrics for each localized market with stakeholders.
- Calculate maintenance ROI: Compare the cost of continuous updates to the revenue from the market.
- Plan for new locales: Use success data and processes to build a case for expanding into additional languages.
Managing this six-stage workflow manually is complex. Technology is essential to coordinate it.
Also Read: Simplifying Content Localization with Anuvadak and Strapi: A Comprehensive Guide
How Anuvadak Automates This Workflow
Managing this six-stage workflow manually creates significant operational bottlenecks. You face disconnected tools, inconsistent glossaries, and slow handoffs between teams. These inefficiencies cause delays, increase costs, and introduce quality risks.
They make scaling beyond one or two languages seem unmanageable for your team. Anuvadak is built to operationalise this exact localization workflow from end to end. Our platform provides the integrated technology stack to execute each stage efficiently.
We automate the manual links between strategy, translation, engineering, and deployment. This turns a complex process into a controlled, scalable business system for both web and mobile.
Here why you should choose us:
- Unified workflow orchestration: Manage website localisation and app localisation projects from a single dashboard, with automated stage progression.
- Automated content synchronisation: Our CMS and developer toolkit connectors detect new source content and automatically queue it for translation.
- Integrated linguistic quality suite: Enforce style guides and glossaries directly within the translator’s workspace for both web copy and app UI strings.
- Developer-friendly APIs: Seamlessly push content from your codebase and pull back localised strings, enabling true continuous localisation.
- Real-time progress analytics: Track the status of every string, page, and screen through each stage of the workflow.
Anuvadak transforms the theoretical localisation workflow into a streamlined, automated reality.
Also read: 3-Solid Reasons to Invest in eCommerce Localisation Now!
Conclusion
Localization functions as a defined six-stage operational workflow. The stages are Discovery, Preparation, Translation, Engineering, Launch, and Maintenance. Each phase has specific inputs, actions, and outputs that feed the next. Success depends on treating it as a continuous business system, not isolated tasks.
Anuvadak is engineered to automate this entire workflow from start to finish. Our platform provides the integrated tools for both website localisation and app localisation. We turn this complex operational model into a controlled, scalable business process. This ensures efficiency, consistency, and measurable growth across all your target markets.
Ready to implement this streamlined workflow? Contact our team to discuss your requirements today.
FAQs
Q. What is the main difference between localization and translation?
Translation is the act of converting text from one language to another. Localization is the complete process of adapting a product or service for a specific market. This includes translation, cultural adaptation, technical modifications, and legal compliance.
Q. How long does a standard website localization process take?
Timelines vary by website size and complexity. A small site may take 6-8 weeks for the initial localization cycle. A large enterprise platform with multiple languages often requires 4-6 months from discovery to launch, followed by ongoing maintenance.
Q. What is a Translation Memory and how does it work?
A Translation Memory (TM) is a database that stores previously translated sentences or segments. When a translator works on new content, the TM suggests these past translations for reuse. This ensures consistency and can reduce translation costs over time.
Q. Do I need to localise my entire website at once?
A phased approach is recommended. Start by localising your most critical pages, such as your homepage, product pages, and checkout process. This allows for faster market entry and lets you test performance before committing to a full-site localization.
Q. What is “continuous localization”?
Continuous localization is the practice of integrating localization into your agile development cycle. As new features or content are added to your source product, they are automatically detected, translated, and deployed, keeping all language versions up to date.
Q. Who should be involved in a localization project from my company?
A cross-functional team is essential. This typically includes a project manager, marketing lead, product/IT representative, and legal/compliance officer for regulated industries. A dedicated localization manager often oversees the entire workflow.